For this project, we’re going to create an internal private network with a total of three devices. With the help of Hyper-V Manger, we can configure three virtual machines. The three VMs will include a Windows Server 2022 OS – the Domain Controller, DHCP, and the main DNS server. It will also include a Windows 11 VM and a Router/Firewall VM known as Pfsense. Below will contain a list of information that will include the Hostname, IP Address, Purpose, and Operating System of each VM.
Windows Server VM –
- Hostname: Domain Controller
- IP Address: 192.168.12.13
- OS: Windows Server 2022
- Purpose: To run domain controller services and manage connected users. This may include remoting into different users, managing passwords, privileges, and changing settings for users. It will also serve as DNS and DHCP.
Pfsense VM –
- Hostname: Pfsense
- IP Address: 192.168.12.17
- OS: Pfsense
- Purpose: To serve as an external Firewall/Router. But, for the given circumstances, mainly as an external web firewall to protect the Domain Controller/Windows Server. We can access the GUI version of it and manage firewall rules that can be set to allow or disallow web traffic to the server.
Windows 11 VM –
- Hostname: Win11
- IP Address: 192.168.12.16
- OS: Windows 11
- Purpose: This machine will act as an end user or client machine connected to the Domain Controller. It wouldn’t have any other services running other than what is set at default of initial installation. Based off the privileges given from active directory, it will have access to the Pfsense GUI by inputting the IP address into its browser URL field.
Common Threats
Now, before we advance further with this little project. It’s important to keep in mind of real life threats that can be hostile towards real life network infrastructures similar to this activity that I’m demonstrating. This internal network is not connected to the internet and is only hosted privately, but in an actual enterprise or business environment, common cyber attacks such as Distributed Denial of Service (DDOS), and DNS spoofing attacks can negatively impact critical business workflows if the network infrastructure isn’t properly secured. DDoS attacks happen when a service such as a server receives a huge amount of packet requests or network traffic all at once. This affects any device connected or attempting to connect to the server, making the server unavailable to process requests. DNS spoofing attacks on the other hand happen when users or servers are tricked to using false fully qualified domain names (FQDNS), which are typically operated or meant for malicious purposes. This happens by changing DNS text file records saved in the machine’s cache, forcing it to search for fake IPs instead of legitimate ones. When dealing with host machines, some other common attacks that can occur are brute force attacks and Viruses. Brute force attacks typically involve a malicious actor using scripting tools that will go through trial and error on every character made possible within a password, until it cracks it. This can take, if not months, years to crack. Depending on how lengthy and complex the host’s password is. If the user uses long and complex characters for their password, chances are that it would be nearly impossible to crack. Viruses are another high threat when it comes to host machines. They operate within files or programs and take effect when either of those are executed. Viruses can steal personal data, disrupt services, or download any other malware for different purposes on host machines.
Mitigating Threats
Some mitigations from threats concerning network devices is by installing configured firewalls or routers to make sure incoming traffic containing malicious behaviors is rejected. Software like Pfsense can be leveraged to create allow or block lists, controlling different ports and flow between ports. It also has features that allow you to control which DNS server to upstream with, allowing your LAN devices to save authentic IP addresses in its DNS record file from a trusted DNS server. For Host machines, installing anti-virus software from vendors or pre-installed packages can help mitigate the likelihood of infection. Most viruses have signatures that scanners can detect and prevent the user from opening a malicious file. Also, creating strong passwords is essential to mitigate leaked credentials from your account, falling victim to brute force attacks.
Configuring The Virtual Network
To resume back to our project, we’ll need to establish the firewall/router, Domain Controller, and Windows host machine LAN. Here is an example of what it looks with all the virtual machines communicating within a private network.

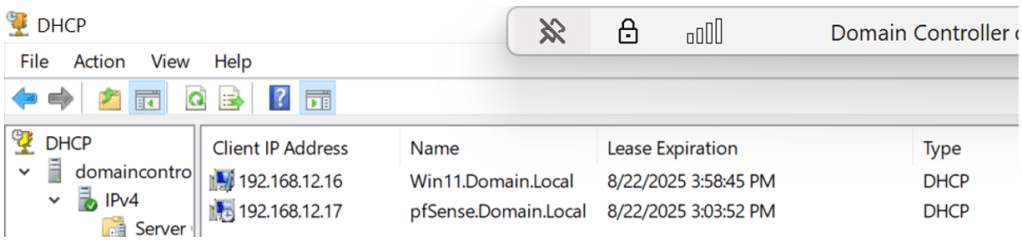
Another thing to note is how the IP addresses interact with each other within a subnet. Since the Domain Controller is also offering service for Dynamic Host Configuration Protocol (DHCP). Both Pfsense and the Windows 11 machines must be given IP addresses by the server within a scope of a subnet or network scope. This can be done through the configuration process of DHCP through the wizard, which can also be automated via PowerShell. Here is an example of what DHCP management looks like via using the Domain Controller server and the PowerShell script that installs Active Directory Domain Services and all sub-features, which includes DNS and DHCP:
- Install-WindowsFeature AD-Domain-Services
-IncludeAllSubFeature -IncludeManagementTools
The two pictures above show how both the Windows 11 and Pfsense VMs are within the same scope of the Domain Controller’s DHCP. Ideally in the real world you wouldn’t want these networking devices to communicate this way. But, for lab purposes it must be configured in that order. The Pfsense is theoretically supposed to act as external firewall for the internal network for the Domain Controller and Windows 11 machine. Now that all VMs are communicating, we still must properly configure each device to ensure device hardening and so that they perform their proper functions.
Domain Controller Configurations

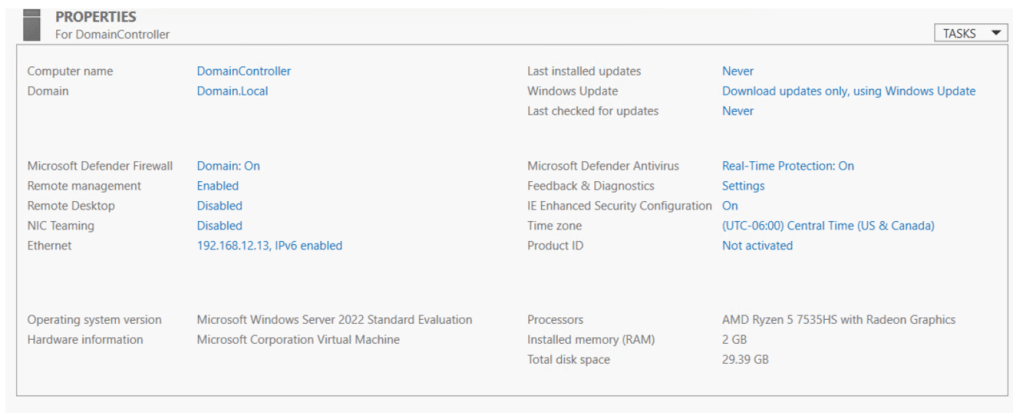
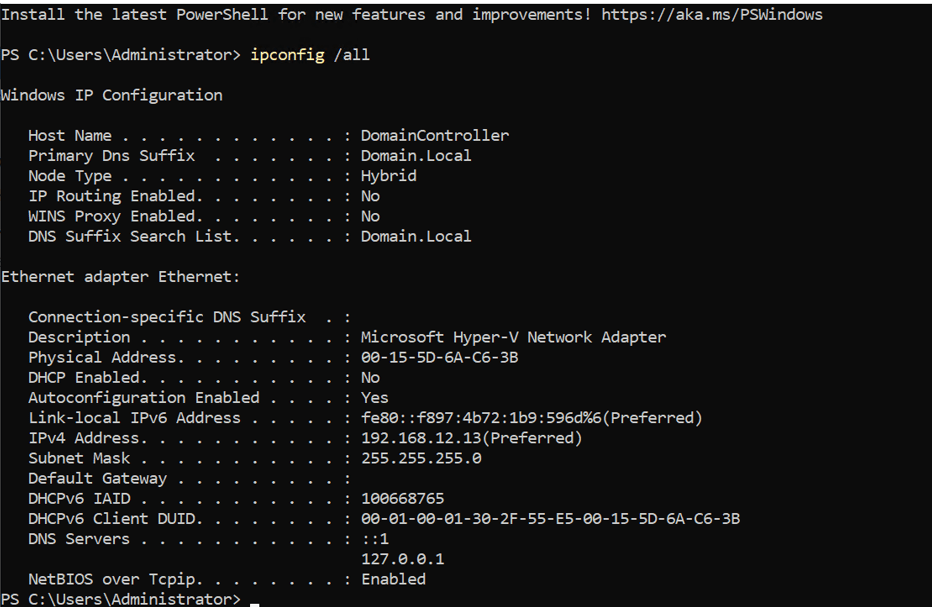
After the installation of the Windows Server 2022, with 30GB of storage and 2048MB of RAM, we have to configure many different services such as DHCP, DNS, and ADDS. To start off, we’ll have to confirm if the Windows Server can even ping to any other devices in the same network. Which in our favor, it does. Then our next step is to navigate through all of the different Wizards to fully establish each service. Take note, that this task can be automated and scripted via using PowerShell. The server offering these services will be given an IP address in the exclusion range or in other words “statically assigned”. It will be given the IP 192.168.12.13. The computer name will be changed to lessen the confusion and show evidence of DNS functioning correctly. The name will be changed to “Domain Controller” that way any devices connected within the same network as it can recognize this machine not only by its IP, but also it by its host name. Time zones will also be changed to display the appropriate time.
Windows 11 Configurations
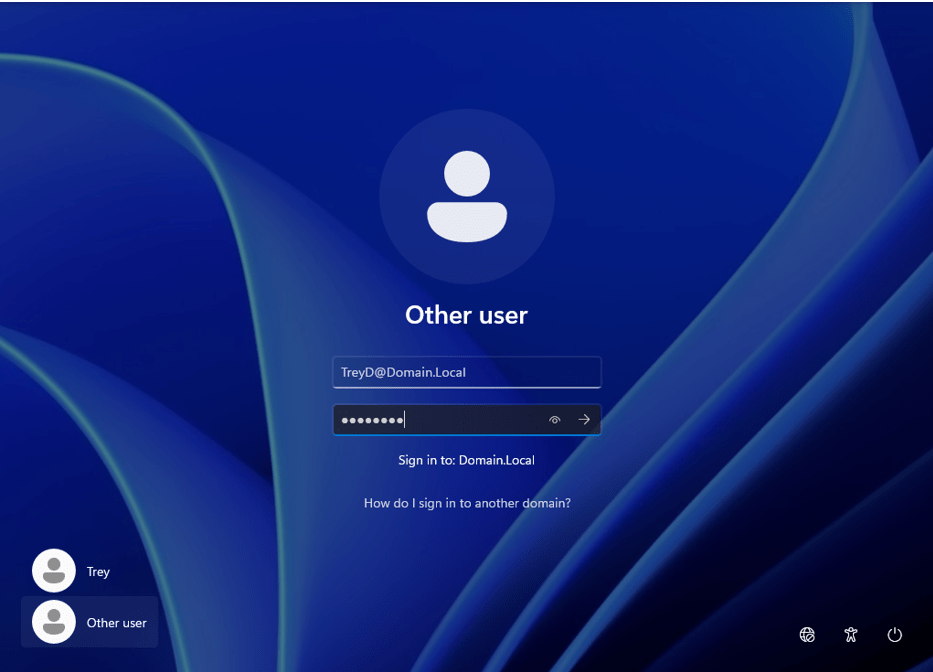
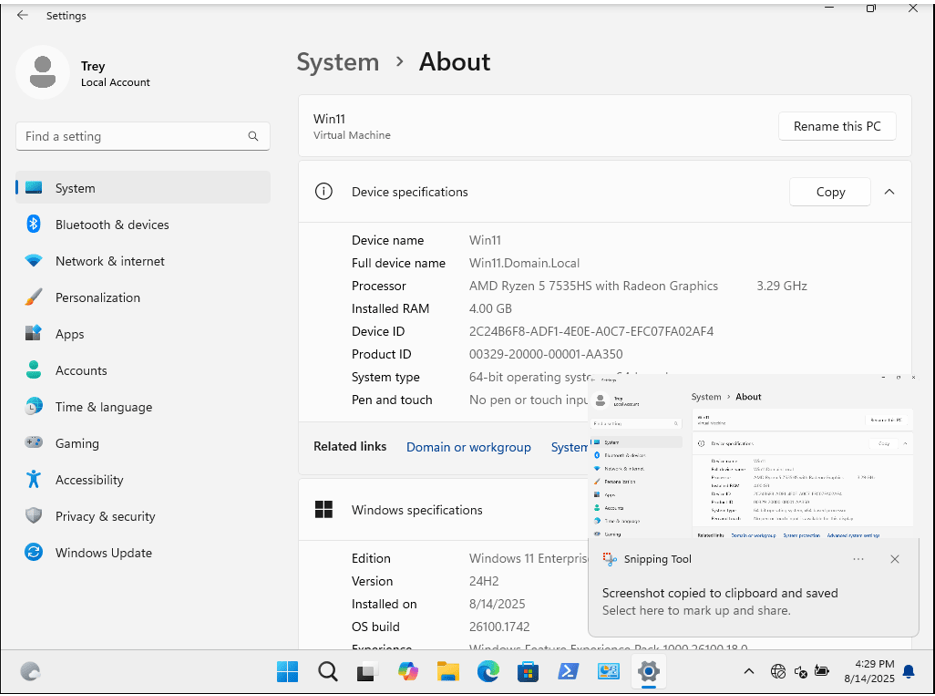
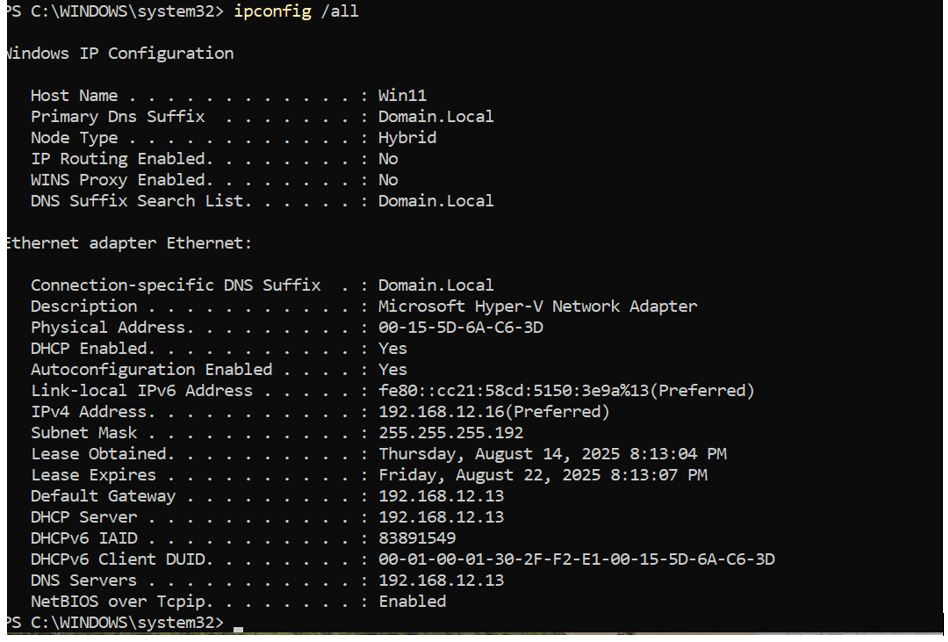
Concerning with the Windows 11 machine, we’ll have to dedicate it to the Domain Controller, rename its host name, and enable the user assigned to the Windows 11 machine to change their password upon logging in once using default credentials. To verify that all VMs are recognizing each other on the same network, we’ll open up PowerShell on the Windows 11 machine and have it ping both the Pfsense and Domain Controller VMs. And it appears that both pings were successful! With the CLI portion of Pfsense already configured and installed, we can now access the browser GUI version of it by typing in its IP address in the URL field of our Windows 11’s browser. We will sign-in as Admin to manage traffic flow of the entire private network. Below is the example of Pfsense being managed via using the GUI:
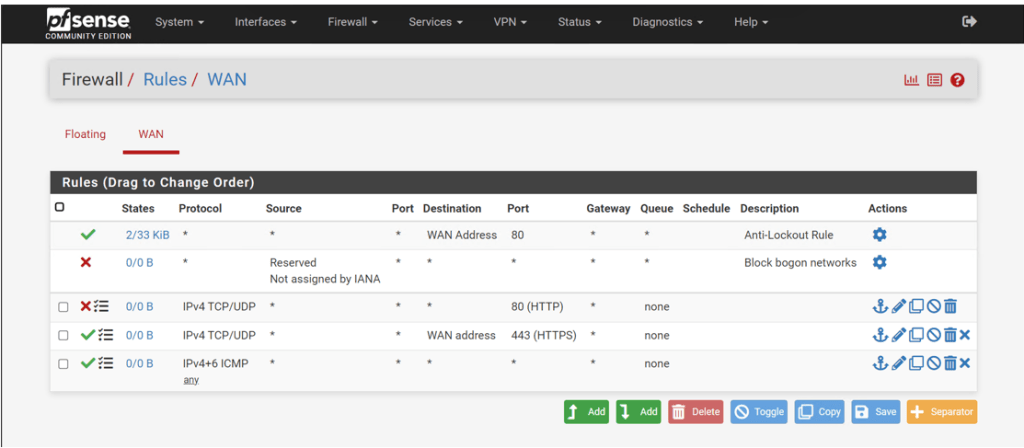
Pfsense Configurations

For Pfsense, after we have initially installed it, we have to reconfigure its network interface. Since it’s booted up within a private network, it only contains the network interface “hn0” as the wide are network. So, “hn0” will need an IP address so that Pfsense can communicate with the internet. In our case, it’s automatically assigned an IP address from the scope of the Domain Controller since it was recognized on the same network.
Analyzing Network Activity
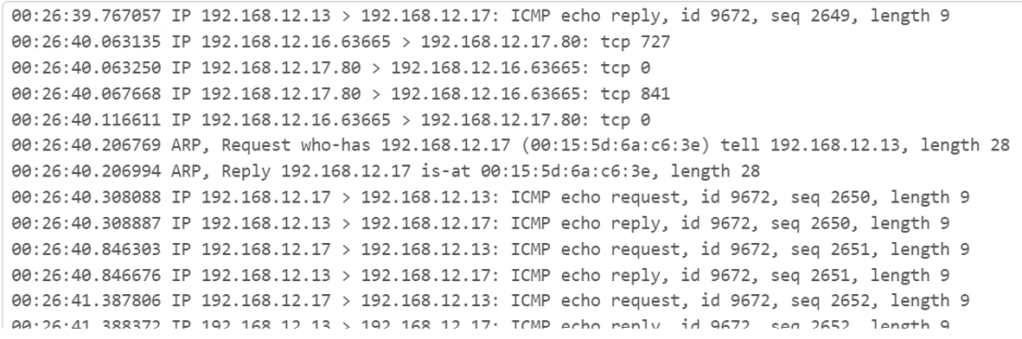
Another feature from the Pfsense GUI is to provide live network traffic of all connected devices within a local area network (LAN). The image above shows packet captures of traffic being constantly communicated between the firewall itself, the server, and the Windows 11 machine. Notice how you can see each of the three VM’s IP addresses responding to each other, using various ports and protocols. Some protocols analyzed from the capture are TCP, ICMP, and ARP. In certain lines, you can see the phrase “who has which IP address” in the capture. The devices are using the address resolution protocol (ARP) to see which IP address has which MAC address.
Recap/Conclusion
Now that we are at the end of this project, let’s briefly review on why these fundamental concepts and tools are important when it comes to managing enterprise network infrastructure. In real-life scenarios, networking devices are vulnerable to various threats such as DNS spoofing, DDoS attacks, brute-force attacks, and malware. Many businesses fall victim to DDoS attacks, particularly when their firewalls or servers are overwhelmed with unnecessary network traffic. DNS spoofing commonly occurs when domain servers route traffic to assumed trusted DNS servers, which may themselves trust malicious ones. This leads to local clients being redirected to spoofed websites. To mitigate these types of threats, it’s important to establish manageable firewalls, such as Pfsense to block and filter unnecessary traffic. Pfsense can also be configured as a router to ensure your internal network only communicates with trusted routers and DNS servers. When it comes to host machines, implementing Group Policy Objects (GPOs) through Active Directory can help harden client systems and reduce the risk of password compromise. Limiting user permissions further reduces the chances of their devices being infected by malware. That’s why in this project, we implemented strict rules for domain users in Active Directory and configured multiple security rules within Pfsense to protect the internal network. With all these security measures in place, this will better keep the local environment under safe conditions when dealing with cyber threats.
